Table of Contents
“Hyper-V cannot be installed: The processor does not have the required virtualization capabilities.”, but does it really not?
Installing Hyper-v in Virtualbox is of course not recommended. You are going to use a virtualization tool and then use another layer of virtualization. For test purposes or just because you can, is it of course possible.
I assume in the blog post below that you already have a virtual machine running Windows OS in VirtualBox. If that is not the case, you can first follow this post.
If you install Hyper-V within VirtualBox you get the following error message:
“Hyper-V cannot be installed: The processor does not have the required virtualization capabilities.”
The problem here is that you want to use virtualization within a host that also uses virtualization, so the virtualization is already occupied by VirtualBox. This makes it impossible to use Hyper-v in Virtualbox.
Fortunately, I have found a solution for this. The manual consists of two parts. The first part is for the system administrators among us with access to PowerShell.
The second part is for end-users who want Hyper-v within VirtualBox. Which is also with PowerShell but explained better including screenshots.
Hyper-v in VirtualBox the basics.
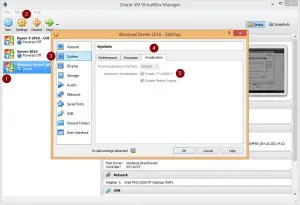
Before we can start we must first verify that virtualization is enabled in VirtualBox.
- Double click the Virtual machine.
- Open the Settings (Gearwheel).
- Go to the tab system.
- Click the tab Acceleration.
- verify if VT-x/AMD-V is enabled.
It may be that this already solves your problem. So you could now check whether you can install Hyper-v in VirtualBox. You can also finish the rest of the tutorial.
Enable Hyper-V with PowerShell.
Start the Virtual Machine and make a remote desktop connection to the Virtual Machine.
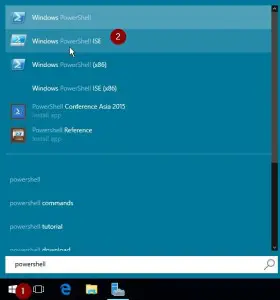
Go to start and search for PowerShell.
The brief and to the point part.
Copy / paste the following commands in PowerShell.
It is best to use it per line.
Enable-WindowsOptionalFeature –Online -FeatureName Microsoft-Hyper-V –All -NoRestart

Install-WindowsFeature RSAT-Hyper-V-Tools -IncludeAllSubFeature

Install-WindowsFeature RSAT-Clustering -IncludeAllSubFeature

Install-WindowsFeature Multipath-IO

Restart-Computer
The longer but clearer explanation for dummies.
First, do not restart the VM while you are doing this. Do not restart the VM until the end.
Copy / paste the command into PowerShell and wait for the script to finish.
Enable-WindowsOptionalFeature –Online -FeatureName Microsoft-Hyper-V –All -NoRestartAgain, Copy / paste the command into PowerShell and wait for the script to finish.
Install-WindowsFeature RSAT-Hyper-V-Tools -IncludeAllSubFeatureAnd again, Copy / paste the command into PowerShell and wait for the script to finish.
Install-WindowsFeature RSAT-Clustering -IncludeAllSubFeature..and again, Copy / paste the command into PowerShell and wait for the script to finish.
Install-WindowsFeature Multipath-IOAt last, Copy / paste the command into PowerShell and wait for virtual machine to re-start.
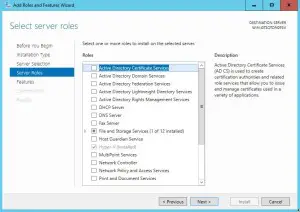
Restart-ComputerIf you now look in Server Manager at Server Roles, you can see that the Hyper-V role is installed on the Virtual Machine.
Summary
The post originally dated from May 28, 2015. I have reviewed the post and thought that it could be worked out better, which is why the post has been re-published on 27-6-2018. The content is still relevant.
Do you have any questions, comments, or other ideas? Then let me know in a comment below.


Hello, I was referred here by the professor “teaching” my introductory Windows System Administration course. This course has us working with Windows Server 2019 in a Oracle VM VirtualBox virtual machine. That said it has us using a book that is based on using either a native Windows Server 2019 installation or a VM installation of in Windows 10 using the built in hypervisor, Hyper-V.
One of my assignments wants me to install Hyper-V on the Windows Server 2019 virtual machine operating in VirtualBox. I can go through the ServerManager add roles and features and add the role. It processes through like it is installing. It restarts the virtual server and continues installing. Finally it restarts the virtual server again and boots to a black screen that says “preparing automatic repair”, “loading files”, and a progress bar. When the progress bar finishes it goes to a black screen and hangs there. It will not load the operating system and even with a “hard reboot” it will not load into the operating system, just stops on that black screen.
After contacting my professor about this today, he responded with a link to this page. To humor him, I don’t it said that I haven’t tried all avenues, I followed the instructions listed here. I still end up with the same result. It goes through the installation motions. I get the same results shown in powershell. When it reboots it does the same thing as before. It restarts the virtual server and continues installing. Finally it restarts the virtual server again and boots to a black screen that says “preparing automatic repair”, “loading files”, and a progress bar. When the progress bar finishes it goes to a black screen and hangs there.
but after running all these commands virtual machine not starting in hyper-v
the virtual machine management service failed to start virtual machine because one of hyper-v component is not working
Some short summary about a Windows 10 Pro guest running on a Linux host under VirtualBox 6.1.
1. VMX pass-through can be enabled using “vboxmanage modifyvm your-vm-name –hwvirtex on” and/or “vboxmanage modifyvm your-vm-name –nested-hw-virt on”.
2. SLAT (Intel EPT) pass-through (required for Hyper-V to work) can’t be enabled because VirtualBox doesn’t support it yet.
3. Setting “nested = Y” for the kvm_intel kernel module on the host doesn’t seem to have any effect.
4. Executing “Enable-WindowsOptionalFeature –Online -FeatureName Microsoft-Hyper-V –All -NoRestart” indeed installs Hyper-V completely, but it has to be completely uninstalled first (the standard “Programs and Features” UI allows you to install it partially — everything but the hypervisor per se).
5. RSAT can be downloaded and installed separately, as mentioned in one of the comments.
6. Running a WSL2 instance still fails at WslRegisterDistribution with “Error: 0x80370102 The virtual machine could not be started because a required feature is not installed.”
So at this point, it seems that VirtualBox is a no-go.
Thank you. That was very helpful. What worked for me was the step by step process starting with Powershell. Every step worked as advertised in my Windows Server 2012 VM. Very much appreciated.
Thank you for very clear explanation.
රෙද්දේ රෙවිල හිටියේ. වැඩ කළා යකු මේක.
Anyone know if it’s possible to edit the .vbox file with options like the ones below for VMWare Workstation. I have this working in VMWare Workstation, but EVERYTHING else is in VirtualBox. I don’t want to have to re-create my entire test environment
hypervisor.cpuid.v0 = “FALSE”
mce.enable = “TRUE”
vhv.enable = “TRUE”
It installs just fine but will not power on a Hyper-V guest VM.
Virtual Machine “New-VM” could not be started because the hypervisor is not running.
Hardware virtualization is enabled on the Settings/System/Acceleration.
Thanks Bas. This worked for installing Hyper V on Server 2019 (guest in VirtualBox)
Next is to see if the guests will boot from the Hyper V Manager.
It cannot be started with “One Hyper-V component is not running” error.
thank you for these steps. i have installed the Hyper-v feature . but will test it out and let you know.
Very helpful tutorial.I understand the command line was to install Hyper-V but I would like to understand what each of them are doing specifically.Thank you
Will do:
This enables Hyper-V on your machine (Hyper-v is necessary to process ‘virtual machines’ on your computer).
Enable-WindowsOptionalFeature –Online -FeatureName Microsoft-Hyper-V –All -NoRestart
This will install the (GUI) management tools:
Install-WindowsFeature RSAT-Hyper-V-Tools -IncludeAllSubFeature
This is needed to keep the VM state when shutting down your PC.
Install-WindowsFeature RSAT-Clustering -IncludeAllSubFeature
Will install Multipath-IO
https://en.wikipedia.org/wiki/Multipath_I/O
Install-WindowsFeature Multipath-IO
Restart-Computer
thank you so much
Thank u very much, was searching like forever for this
Simple and powerful solution! When Windows GUI prompted it can’t, when many technical articles mentioned it can’t, you mentioned it CAN. It’s just installed. Thanks a lot!
great solution
Thank you very much bro. You are a legend.
np 🙂
Thank you for your support!
Np! 🙂
Thanks for the blog entry.
What is actually the need of the RSAT features?
The first cmdlet ( Enable-WindowsOptionalFeature –Online -FeatureName Microsoft-Hyper-V –All) already installs all Hyper V on the local machine (tested in Win10 Pro x64).
The RSAT cmdlet target remote machine and per default not included in Win10/2016, as explained here.
https://peter.hahndorf.eu/blog/WindowsFeatureViaCmd
Only the “Multiple-IO” sounds useful to me.
Goal: use my dev env (Visual Studio 2015) in a VM in VirtualBox, and use there Hyper V for the mobile emulator.
I downloaded the RSAT package, but the cmdlet cannot be run on Windows 10 Pro. It seems to be only for Windows Server.
Anyway, the first cmdlet only already install all packages on Win10 Pro.
However, when I create one VM on Hyper V and start it, I got the following error:
‘TestVM’ failed to start.
The Virtual Machine Management Service failed to start because one of the Hyper-V components is not running.
So it seems I need a Windows Server to run the full cmdlets and install the required packages.
I thought that someone had finally cracked the nested VM in virtualbox – but not so. Hyper-V installs but there are issues with some components that prohibit the installation of a VM into that next layer.
Two errors that I cannot seem to fix in HyperV:
15350 The virtualization infrastructure driver (VID) is not running. And as a consequence 15340 The virtual machine bus is not running. I you have way of fixing this that would be much appreciated.
Did you ever get this working? I’m having the same problem.
I have the same problem. I can install Hyper-V but most of the services will not start and consequently, VMs will not boot.
Hi the same here, I have windows server 2016 installed in virtualBox, following the mentioned commands powershell
I managed to install hyper-v, however when I create the VM I’m not able to make them start, I have tried with the nested virtualization but no luck…
For anyone still having problems with this: When trying to use nested VM in VMWARE Workstation you need to add the following lines in the vmx file, open it using text editior and add the following lines. This will allow you to run nested VM within Windows Server 2012 inside VMWARE. After doing this Hypervisor should now run your virtual machines.
hypervisor.cpuid.v0 = “FALSE”
mce.enable = “TRUE”
vhv.enable = “TRUE”
… but you can’t start Virtual-Machines with these Setup… right ?
Thank you Bas.
i tried it with windows home edition.its work too
Hi,
I’d like to use hyperv in a VM as you describe, but Step 2 (Install-WindowsFeature RSAT-Hyper-V-Tools -IncludeAllSubFeature) doesn’t work:
PS C:\Windows\system32> Install-WindowsFeature RSAT-Hyper-V-Tools -IncludeAllSubFeature
Install-WindowsFeature : The term ‘Install-WindowsFeature’ is not recognized as the name of a cmdlet, function, script
file, or operable program. Check the spelling of the name, or if a path was included, verify that the path is correct
and try again.
At line:1 char:1
+ Install-WindowsFeature RSAT-Hyper-V-Tools -IncludeAllSubFeature
+ ~~~~~~~~~~~~~~~~~~~~~~
+ CategoryInfo : ObjectNotFound: (Install-WindowsFeature:String) [], CommandNotFoundException
+ FullyQualifiedErrorId : CommandNotFoundException
I tried to replace it with Get… and Add…, but no.
Neither did this one work:
PS C:\Windows\system32> Enable-WindowsOptionalFeature -Online -FeatureName RSAT-Hyper-V-Tools -All
Enable-WindowsOptionalFeature : Feature name RSAT-Hyper-V-Tools is unknown.
At line:1 char:1
+ Enable-WindowsOptionalFeature -Online -FeatureName RSAT-Hyper-V-Tools …
+ ~~~~~~~~~~~~~~~~~~~~~~~~~~~~~~~~~~~~~~~~~~~~~~~~~~~~~~~~~~~~~~~~~~~~~
+ CategoryInfo : NotSpecified: (:) [Enable-WindowsOptionalFeature], COMException
+ FullyQualifiedErrorId : Microsoft.Dism.Commands.EnableWindowsOptionalFeatureCommand
Any clue? I’m running Windows 10 Pro 64bits, on macos El Capitan, in Virtual Box 5.0.16, with acceleration Hyper-V (described in the summary of the VM as “VT-x/AMD-V, Nested Paging, Hyper-V Paravirtualization”)
Thanks for your help
hello,
What OS are you using in your VM?
Windows 10 pro 64 bits
You might have to download RSAT from here:
https://www.microsoft.com/en-us/download/details.aspx?id=45520
Big thank! I think that did most of the trick. Now I just have a network issue: The requested address is not valid in its context. I’ll have to try different network options in virtual box I guess:
[04:30:16.687][Program ][Info ] Version 1.11.1-beta11 (build: 2789)
[04:30:16.687][Program ][Info ] Starting on: 5/15/2016 4:30:16 AM
[04:30:16.687][Program ][Info ] Resources: C:\Program Files\Docker\Docker\Resources
[04:30:16.704][Program ][Info ] OS: Windows 10 Pro
[04:30:16.706][Program ][Info ] Edition: Professional
[04:30:16.718][Program ][Info ] Id: 1511
[04:30:16.718][Program ][Info ] Build: 10586
[04:30:16.718][Program ][Info ] BuildLabName: 10586.103.amd64fre.th2_release.160126-1819
[04:30:16.718][Program ][Info ] Mixpanel Id: 8f695231-107f-4288-8318-73ef2cc75fda
[04:30:16.734][Program ][Info ] Sha1: b0bc231ec0337a84cc1ce50f51df77f9b0f5c993
[04:30:16.734][Program ][Info ] You can send feedback, including this log file, at https://forums.docker.com/c/docker-for-windows
[04:30:16.874][Mixpanel ][Info ] Tracking: appLaunched
[04:30:17.909][Mixpanel ][Info ] Tracking: heartbeat
[04:30:17.921][BackendServer ][Info ] Started
[04:30:18.140][NamedPipeClient][Info ] Sending Version()…
[04:30:18.140][NamedPipeServer][Info ] Version()
[04:30:18.140][NamedPipeServer][Info ] Version done.
[04:30:18.156][NamedPipeClient][Info ] Received response for Version: Version 1.11.1-beta11 (build: 2789)
[04:30:18.156][NamedPipeClient][Info ] Sending CheckInstallation()…
[04:30:18.156][NamedPipeServer][Info ] CheckInstallation()
[04:30:18.156][HyperV ][Info ] Check Hyper-V Windows optional feature
[04:30:18.171][PowerShell ][Info ] Run script…
[04:30:18.655][HyperV ][Info ] Hyper-V Windows feature is enabled
[04:30:18.655][NamedPipeServer][Info ] CheckInstallation done.
[04:30:18.655][NamedPipeClient][Info ] Received response for CheckInstallation:
[04:30:18.671][NamedPipeClient][Info ] Sending CheckHyperVState()…
[04:30:18.671][NamedPipeServer][Info ] CheckHyperVState()
[04:30:18.671][HyperV ][Info ] Check Hyper-V Service State
[04:30:18.687][PowerShell ][Info ] Run script with parameters: -Check True…
[04:30:23.108][HyperV ][Info ] Hyper-V is running and responding
[04:30:23.108][HyperV ][Info ] Hyper-V is running
[04:30:23.140][NamedPipeServer][Info ] CheckHyperVState done.
[04:30:23.155][NamedPipeClient][Info ] Received response for CheckHyperVState:
[04:30:23.187][Authentication ][Info ] Checking token
[04:30:23.312][Authentication ][Info ] Token is valid
[04:30:23.468][NamedPipeClient][Info ] Sending Stop()…
[04:30:23.483][Updater ][Info ] Checking for updates on the Beta channel…
[04:30:23.483][NamedPipeServer][Info ] Stop()
[04:30:23.483][HyperV ][Info ] Stop
[04:30:23.483][PowerShell ][Info ] Run script with parameters: -Stop True…
[04:30:24.499][HyperV ][Info ] Kill VM MobyLinuxVM…
[04:30:24.531][HyperV ][Info ] VM MobyLinuxVM is stopped
[04:30:24.531][Firewall ][Info ] Closing ports…
[04:30:24.546][PowerShell ][Info ] Run script…
[04:30:25.015][Updater ][Info ] Found remote version. Version = 1.11.1.2789
[04:30:25.015][Updater ][Info ] Local version is up to date.
[04:30:25.015][Updater ][Info ] Check for update done.
[04:30:25.327][Firewall ][Info ] Ports are closed
[04:30:25.343][NamedPipeServer][Info ] Stop done.
[04:30:25.343][NamedPipeClient][Info ] Received response for Stop:
[04:30:25.343][NamedPipeClient][Info ] Sending Start(2, 2048)…
[04:30:25.343][NamedPipeServer][Info ] Start(2, 2048)
[04:30:25.359][Firewall ][Info ] Opening ports for C:\Program Files\Docker\Docker\Resources\com.docker.proxy.exe and C:\Program Files\Docker\Docker\DockerForWindows.exe…
[04:30:25.359][PowerShell ][Info ] Run script…
[04:30:26.483][Firewall ][Info ] Ports are opened
[04:30:26.483][HyperV ][Info ] Create
[04:30:26.483][PowerShell ][Info ] Run script with parameters: -Create True -CPUs 2 -Memory 2048 -IsoFile C:\Program Files\Docker\Docker\Resources\mobylinux.iso…
[04:30:27.218][HyperV ][Info ] Using existing Switch: DockerNAT
[04:30:27.515][HyperV ][Info ] Using existing Switch IP address
[04:30:27.562][HyperV ][Info ] Using existing Net NAT: DockerNAT
[04:30:28.765][HyperV ][Info ] Using existing: MobyLinuxVM
[04:30:28.937][HyperV ][Info ] Setting MobyLinuxVM vm CPUs to 2 and Memory to 2048 MB
[04:30:28.952][Dhcp ][Info ] Dhcp starting on port 67, on interface vEthernet (DockerNAT)…
[04:30:28.984][Dhcp ][Error ] Unable to start the dhcp server: The requested address is not valid in its context. Will retry.
[04:30:29.499][Dhcp ][Error ] Unable to start the dhcp server: The requested address is not valid in its context. Will retry.
[04:30:30.015][Dhcp ][Error ] Unable to start the dhcp server: The requested address is not valid in its context. Will retry.
[04:30:30.531][Dhcp ][Error ] Unable to start the dhcp server: The requested address is not valid in its context. Will retry.
[04:30:31.046][Dhcp ][Error ] Unable to start the dhcp server: The requested address is not valid in its context. Will retry.
[04:30:31.562][Dhcp ][Error ] Unable to start the dhcp server: The requested address is not valid in its context. Will retry.
[04:30:32.077][Dhcp ][Error ] Unable to start the dhcp server: The requested address is not valid in its context. Will retry.
[04:30:33.109][Dhcp ][Error ] Unable to start the dhcp server: The requested address is not valid in its context. Will retry.
[04:30:33.625][NamedPipeServer][Error ] Unable to executeStart: The requested address is not valid in its context
[04:30:33.625][NamedPipeClient][Error ] Unable to sending Start: The requested address is not valid in its context
[04:30:33.625][Notifications ][Error ] Error: The requested address is not valid in its context
[04:30:43.718][Program ][Info ] Sending Bugsnag report 3dc1204a-7162-4aee-b40d-c87fed8cd924 …
[04:30:46.593][Program ][Info ] Bugsnag report sent
>ipconfig
Windows IP Configuration
Ethernet adapter Ethernet:
Media State . . . . . . . . . . . : Media disconnected
Connection-specific DNS Suffix . :
Ethernet adapter vEthernet (DockerNAT):
Media State . . . . . . . . . . . : Media disconnected
Connection-specific DNS Suffix . :
Ethernet adapter vEthernet (DockerNAT):
Media State . . . . . . . . . . . : Media disconnected
Connection-specific DNS Suffix . :
Ethernet adapter vEthernet (DockerNAT):
Connection-specific DNS Suffix . :
Link-local IPv6 Address . . . . . : fe80::888b:5851:d0df:832%5
Autoconfiguration IPv4 Address. . : 169.254.8.50
Subnet Mask . . . . . . . . . . . : 255.255.0.0
Default Gateway . . . . . . . . . :
Ethernet adapter VirtualBox Host-Only Network:
Connection-specific DNS Suffix . :
Link-local IPv6 Address . . . . . : fe80::78e9:98ff:df5b:2d74%7
IPv4 Address. . . . . . . . . . . : 192.168.56.1
Subnet Mask . . . . . . . . . . . : 255.255.255.0
Default Gateway . . . . . . . . . :
Tunnel adapter isatap.{475AB8B5-0120-421E-8B8B-219CB7FA49AE}:
Media State . . . . . . . . . . . : Media disconnected
Connection-specific DNS Suffix . :
Tunnel adapter isatap.{40504911-513E-4579-9C86-12698DA2B1BD}:
Media State . . . . . . . . . . . : Media disconnected
Connection-specific DNS Suffix . :
C:\Users\matthieudelaro>