
Table of Contents
Keep your PowerShell modules updated!
We will do all of this with Azure Automation and PowerShell, you can also do this in a ci / cd pipeline, but that’s up to you.
Disclaimer: Everything will be simplified, these are steps you can follow, but you must modify before it works in your own environment.
What do we need?
- A Virtual Machine or an Azure Automation account
- A StorageAccount with a Container
- Your Azure Automation Identity or Pipeline Service Principal (for Azure DeVops) needs Access to the storage container with least permission: Storage Blob Data Contributor
Below you can decide if you either want to use Custom Modules directly, or downloaded from the PowerShell Gallery.
- We need to convert the modules to zip files first
- But what if we want to do the same with modules in the PowerShell Gallery?
We need to convert the modules to zip files first
Fortunately, this is not that difficult.
You can use the standard Compress-Archive cmdlet for this.
Make sure you include the entire directory, so as an example I have my Optimized.Mga module below in the Optimized.Mga directory and I’m zipping it.
$PathToModules = 'C:\Path\To\Modules'
$Path = 'C:\Path\To\ZipFiles'
Get-ChildItem -Path $PathToModules -Resurce | Compress-Archive -DestinationPath "$Path\$($_.Name).zip" -Force
If your module has sub directories, do not forget to use the -Recurse parameter.
But what if we want to do the same with modules in the PowerShell Gallery?
And import them directly in to our Azure Automation without manual steps by going to the portal? That is also possible and works in much the same way!
The direct download URL from the PowerShell Gallery
The first thing we need is the direct URL to the Nupkg module. Via this link we can download the NuGet package.
A Nupkg is basically a single zip file. If you want to know more about NuGet packages: What is NuGet and what does it do? | Microsoft Learn
We can request the URL in 2 ways, in the browser or in PowerShell.
It’s a bit easier to understand in the browser, but we’d be doing everything in PowerShell, so I’ll give you both options.
Get the direct download URL with the browser
For the browser you can just,
- Go to https://powershellgallery.com
- Search for the module you want
- And then click on the Manual Download tab
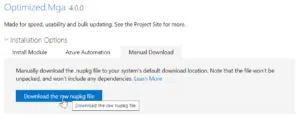
- Right-click on the Download the raw nupkg file and choose Inspect
- The developer tools will be opened and you will see the download url

So, for me this would be 'https://www.powershellgallery.com/api/v2/package/Optimized.Mga/4.0.0'
The downside to this is that when you automate it this way you never get the latest version, because it’s hardcoded in the URL, which is why I prefer using PowerShell.
Get the direct download URL with PowerShell
The Install-Module cmdlet should suffice, but unfortunately this does not show the download link and the file is unpacked immediately, so we are going to have to reverse engineer Install-Module.
When using running Fiddler the same time as when I use the below cmdlet
It will show me these results:
Host	                        URL
www.powershellgallery.com	/api/v2/FindPackagesById()?id='optimized.mga'&$skip=0&$top=40
www.powershellgallery.com	/api/v2/FindPackagesById()?id='optimized.mga'&$skip=0&$top=40
www.powershellgallery.com	/api/v2
www.powershellgallery.com	/api/v2/FindPackagesById()?id='Optimized.Mga'&$skip=0&$top=40
www.powershellgallery.com	/api/v2/package/Optimized.Mga/4.0.0
psg-prod-eastus.azureedge.net	/packages/optimized.mga.4.0.0.nupkg
I’m not going to go through the URLs with you, but what eventually happened is that this URL retrieves all the versions in the PowerShell Gallery: https://www.powershellgallery.com/api/v2/FindPackagesById()?id='Optimized.Mga'&$skip=0&$top=40
The cmdlet then determines which version is the latest and then retrieves it with this url: https://www.powershellgallery.com/api/v2/package/Optimized.Mga/4.0.0
That’s the same URL that the browser uses. So, we just need to build something in PowerShell that grabs the latest version.
This should suffice and we will have the direct download link:
$ModuleName = "Optimized.Mga"
$Versions = Invoke-RestMethod -Uri "https://www.powershellgallery.com/api/v2/FindPackagesById()?id='$ModuleName'&`$skip=0&`$top=40"
$LatestURL = $Versions.Content.src | Sort-Object -Descending | Select-Object -First 1
Download the package from the PS Gallery
This is pretty easy.
With the cmdlet below you can download a module.
Adjust the -OutFile parameter to the location that suits you.
$ModuleName = "Optimized.Mga"
Invoke-RestMethod -Uri $LatestURL -OutFile "$ModuleName.zip" -ContentType 'application/octet-stream'
Let’s upload this to an Azure Storage Container
Ultimately, you’re going to be using this in Azure Automation, a pipeline, or something similar , which is why your Service Principal will need access to the Azure Storage account.
To upload to an Azure Storage Container you can use this (Simplified):
# Variables
$SubscriptionId = 'xxxxxxxx-xxxx-xxxx-xxxx-xxxxxxxxxxxx'
$RgName = 'rgName'
$Storage = 'storageAccountName'
$StorageContainer = 'containerName'
$Path = 'C:\Path\To\ZipFiles'

# Connect to Azure
Connect-AzAccount -Identity

# Set the AzContext to the correct subscription (if you have more than 1)
$null = Set-AzContext -SubscriptionId $SubscriptionId

# Get the StorageAccount and context
$storageAccount = Get-AzStorageAccount -ResourceGroupName $rgName -AccountName $Storage
$CTX = $storageAccount.Context

# Get Zipped files (can be multiple this way)
$Items = Get-ChildItem -Path $Path
foreach ($Item in $Items) {
    # By using -Force we will overwrite items in Blob
    $Item | Set-AzStorageBlobContent -Container $StorageContainer -Context $CTX -Force
}
Import the modules in to Azure Automation, Virtual Machines, or even local machines!
The steps below can be performed in Azure Automation or on a local / virtual machine. There are a few difference and I will explain.
The modules are now centrally located in the Azure Storage container, whether from a repository, local environment, or the PowerShell Gallery, from here we can import them again and we do this by first downloading the .zip files from the container.
We will use Invoke-RestMethod again.
The URL structure for the blob container is as follows:https://StorageAccount.blob.core.windows.net/StorageContainer/ZipFile
Update StorageAccount & StorageContainer with the correct names.
ZipFile will be updated in the script itself.
Since we already have a list from the Get-ChildItem I use it again to download or upload the .zip files one by one.
This way you always keep the current list you started with and don’t accidentally download more than you intended.
We will do this using a foreach loop.
In the foreach loop there are 2 seperate steps for Azure Automation or Virtual Machines, make sure to remove one of them.
The complete loop:
$MainURL = "https://$Storage.blob.core.windows.net/$StorageContainer"
foreach ($Item in $Items) {
    # Let's build the URL first
    $URL = "$MainURL/$($Item.Name)"

    # Import the module in Azure Automation
    New-AzAutomationModule -AutomationAccountName $AutomationAccountName -Name $Item.BaseName -Path $URL -ResourceGroupName $RgName

    # Import the module on a virtual machine
    Invoke-RestMethod -Uri $URL -OutFile "C:\temp\$($Item.Name)" -ContentType 'application/octet-stream'
    Expand-Archive -Path "C:\temp\$($Item.Name)" -DestinationPath "$($PSHome)\modules\$($Item.BaseName)"
}
Azure Automation
With Azure Automation we will need a ‘download’ link we build in the foreach loop with the name.
New-AzAutomationModule -AutomationAccountName $AutomationAccountName -Name $Item.BaseName -Path $URL -ResourceGroupName $RgNameVirtual Machines
With a virtual machine we will have to download the .zip from the storage container, expand the .zip & import it in the $PSHome path.
Invoke-RestMethod -Uri $URL -OutFile "C:\temp\$($Item.Name)" -ContentType 'application/octet-stream'
Expand-Archive -Path "C:\temp\$($Item.Name)" -DestinationPath "$($PSHome)\modules\$($Item.BaseName)"
The complete script
The script will be maintained on Github.
Script used in current blog:
#region Variables

$AzSubscriptionId = 'xxxxxxxx-xxxx-xxxx-xxxx-xxxxxxxxxxxx'
$RgName = 'rgName'
$Storage = 'storageAccountName'
$StorageContainer = 'containerName'
$PathToModules = 'C:\Path\To\Modules'
$Path = 'C:\Path\To\ZipFiles'
$AutomationAccountName = 'AutomationAccountName'
$ModuleName = "Optimized.Mga"

#endregion Variables
#region Convert to Zip files

Get-ChildItem -Path $PathToModules -Resurce | Compress-Archive -DestinationPath "$Path\$($_.Name).zip" -Force

#endregion Convert to Zip files
#region Download from PowerShell Gallery

$Versions = Invoke-RestMethod -Uri "https://www.powershellgallery.com/api/v2/FindPackagesById()?id='$ModuleName'&`$skip=0&`$top=40"
$LatestURL = $Versions.Content.src | Sort-Object -Descending | Select-Object -First 1
Invoke-RestMethod -Uri $LatestURL -OutFile "$ModuleName.zip" -ContentType 'application/octet-stream'

#endregion Download from PowerShell Gallery
#region Login to Azure

# Connect to Azure
Connect-AzAccount -Identity

# Set the AzContext to the correct subscription (if you have more than 1)
$null = Set-AzContext -SubscriptionId $AzSubscriptionId

#endregion Login to Azure
#region Upload zip to blob

# Get the StorageAccount and context
$storageAccount = Get-AzStorageAccount -ResourceGroupName $rgName -AccountName $Storage
$CTX = $storageAccount.Context

# Get Zipped files (can be multiple this way)
$Items = Get-ChildItem -Path $Path
foreach ($Item in $Items) {
    # By using -Force we will overwrite items in Blob
    $Item | Set-AzStorageBlobContent -Container $StorageContainer -Context $CTX -Force
}
#endregion Upload zip to blob

#region Import zip in Azure Automation / Virtual Machine
$MainURL = "https://$Storage.blob.core.windows.net/$StorageContainer"
foreach ($Item in $Items) {
    # Let's build the URL first
    $URL = "$MainURL/$($Item.Name)"

    # Import the module in Azure Automation
    New-AzAutomationModule -AutomationAccountName $AutomationAccountName -Name $Item.BaseName -Path $URL -ResourceGroupName $RgName

    # Import the module on a virtual machine
    Invoke-RestMethod -Uri $URL -OutFile "C:\temp\$($Item.Name)" -ContentType 'application/octet-stream'
    Expand-Archive -Path "C:\temp\$($Item.Name)" -DestinationPath "$($PSHome)\modules\$($Item.BaseName)"
}

#endregion Import zip in Azure Automation / Virtual Machine